
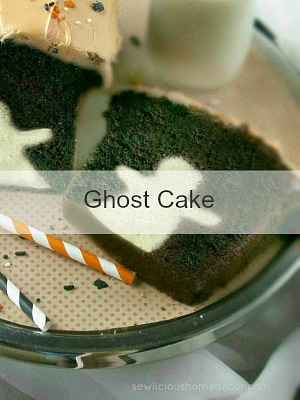

Halloween Chocolate Ghost Cake
Scare up some fun this Halloween with a delicious ghost cake. This Chocolate Ghost Cake is not only over the top delicious, it’s fun and easy to make. All you need for the spooky ghost is a cookie cutter.
This cake is cute, simple and delicious…you can’t get any better than that!
Today was one of my favorite days. I played in the kitchen with cake and cookie cutters.
What could be more fun than that? Besides shopping!! lol
This cute little ghost cake is really simple and fun!
This cake is easier than it looks…..anyone can do it!
Here’s the simple directions….You’re going to bake two cakes. One white cake and one chocolate cake.
You will bake your white cake in a 9×13 pan. This will make it easy to cut out the ghosts with your cookie cutter and give you nice thick ghosts. You want your ghosts to be at least 1-2″ thick! No Less!
Once you have cut out the ghosts, you will line a loaf pan with foil and place them in the pan as shown below. Make sure they fit nice and snug, otherwise they will fall to one side or move around all over the pan.
SO MAKE SURE THEY FIT TIGHTLY TOGETHER IN THE PAN.
Next, you will pour your chocolate cake batter over them.
Here are a few helpful tips:
FOLLOW ALL THE INSTRUCTIONS ABOVE EXACTLY!
MAKE SURE THE GHOSTS FIT TIGHTLY TOGETHER IN THE PAN. They will move all over the place if they aren’t fit tightly together.
MAKE SURE YOUR COOKIE CUTTER IS AT LEAST 1-2″ thick. No less!
Gently, pour the chocolate cake batter on one side, then the other side, then pour the remaining batter on top.
If you pour the batter directly on top first, the ghost will fall to one side.
Grease your cookie cutter with oil. You can just spray it with cooking oil before cutting out the ghosts so the arms won’t stick to the cookie cutter. Trust me, the arms will nearly fall off so be careful with the arms!! (Tip: Don’t use butter or it will color the white ghost yellow)
- 1¾ cups all-purpose flour
- 2 cups sugar
- ¾ cups quality cocoa powder
- 2 teaspoons baking soda
- 1 teaspoon baking powder
- 1 teaspoon kosher salt
- 1 cup buttermilk
- ½ cup vegetable oil
- 2 extra-large eggs, at room temperature
- 1 teaspoon pure vanilla extract
- ½ cup warm milk
- 1 Box white cake mix
- 3 eggs
- 1 cup water
- ¼ vegetable oil
- Food coloring
- 3 tablespoons butter, melted
- 3 oz. cream cheese, softened
- 2 cups powdered sugar
- 2 teaspoons vanilla extract
- Sift the flour, sugar, cocoa, baking soda, baking powder, and salt. Mix together. In another bowl, combine the buttermilk, oil, eggs, and vanilla. Slowly add the wet ingredients to the dry. With mixer on low, add in milk. Mix well. Pour batter down the sides of your loaf pan then on top of the ghosts. Bake for 35 to 40 minutes, until a cake tester comes out clean. Cool before frosting.
- Combine cake mix, eggs, water and oil and mix well. Pour in a prepared 9x13 pan, Cook until tested done. Let cool then cut out using ghost cookie cutters. Line them up in a loaf pan, making sure to add enough so they fit tightly together and not falling over.
- Pour chocolate cake batter over ghosts. Bake until tested done.
- Mix together melted butter and cream cheese. Add powdered sugar and vanilla. Add in food coloring if you want to make it Halloween colors. Spread on cooled cake.
- NOTE: You can substitute this cake mix for a boxed cake mix if you prefer.
NOTE: You can substitute this cake for a boxed cake (any flavor) if you prefer.
Pumpkin Spice Cake with Maple Glaze
Follow SewLicious Home Decor’s board Halloween Decor and Craft Ideas on Pinterest.


Sue says
Thanks!
😀 You’re welcome!
Sue says
Do you need to spray the foil with Pam spray
Yes, it helps but when I forget to the foil peels right off the cake. So if you don’t it will still turn out. 😀
Amanda Vanderwarf says
Hi! I MUST have done something wrong… My white cake inserts floated to the top after I carefully added the chocolate cake batter. Have you ever heard of this happening?
Oh my goodness! What probably happened is that the ghosts were not “snug” enough. The ghosts need to be thick, I used about a 1-2″ thick cookie cutter and when you line them in the loaf pan you need to add several so that they are fit tightly and snug together. If they are snug they won’t move at all. Sorry the first one didn’t turn out, but as I always say….never give up! Practice, practice practice until it comes out perfect!
These are so cool! How very creative you are. Now can you come over and bring one of them with you? 🙂
Thank you, Sandra!! 🙂 It was so fun to make!
this is such a fun idea for holidays
Thank you, Heather! It was so fun to make! 🙂 xoxo Marti
What a great idea! I love it. Pinned!
Thank you, Elizabeth!! 🙂
I love this ghost cake! So cute and looks so yummy! Thanks for sharing! PINNED!
Thank you, Michelle!! 🙂
This is genius! I love it! Thank you for linking it up to Show Me Saturday!
Thank you so much, Lindsay!! and thank you for hosting the party. 🙂
This is adorable, Marti! I bet kids would go crazy for it:) Pinned!
Thank you, Ginnie!! 🙂
Visiting from Welcome To Show Me Saturday link party. This cake looks brilliant, I love it! I co-host Sweet and Savoury Sunday and would love for you to stop by and share this and other recipes with us when the party goes live on Sunday. Have a great day!
Thank you, Laura!! 🙂
You are so stinkin SMART! I love this cake. Great job on the tutorial too!
Pinning! 😉
~ Ashley
Thank you!! Want me to make you one?! 😉