


An Insulated Loaf Pan Carrier made with a kitchen towel to keep your loafs warmer, longer and so you don’t have to handle a hot dish. Great to use for taking to parties or sit on your counter to keep from burning your counter top.
This is an easy tutorial that takes you through each step. With just a few easy steps, you can make this if you’re a beginner or advanced sewer.
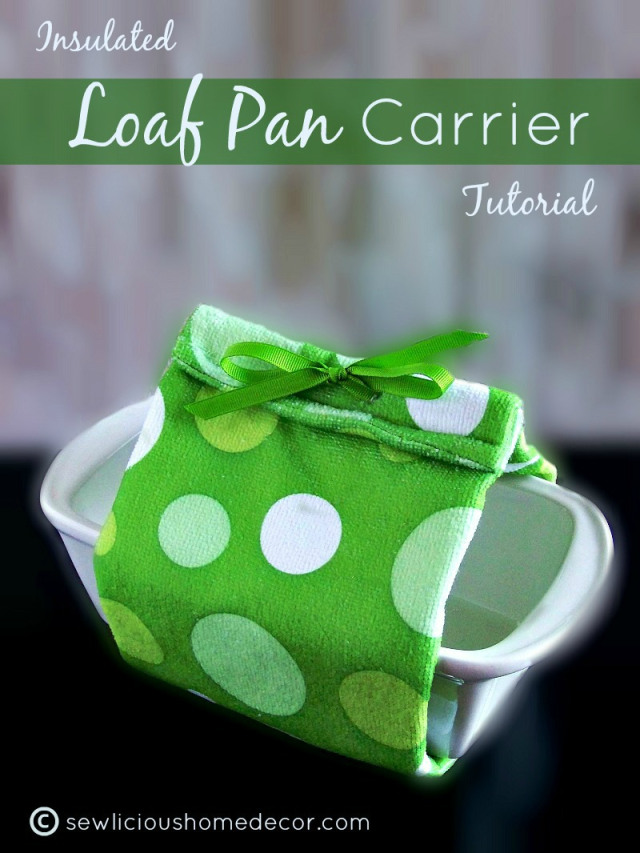
Pre-wash your fabric and Insul-Bright so it won’t shrink later!
First, gather your supplies. You will need one kitchen towel. Check your towel to make sure it’s the right size and fits all the way around your loaf pan with some extra for folding over. Mine was 23 inches long.
Next, you will need some Insul-Bright
Insul-Bright consist of polyester fibers that reflects either hot or cold back to it’s source. It is washable and feels like batting. It is heat-RESISTANT, NOT heat-proof so do not put it in the microwave. If you want to warm your loaf in the microwave or oven, remove the Insulated Carrier first.
You’ll also need matching ribbon, a needle with a wide eye, and matching thread.
First, fold your towel in half, right sides together. Cut one piece of Insul-Bright the size of your towel when it’s folded in half. Pin the Insul-Bright to the outside side of your towel. Sew the Insul-Bright onto your towel, sewing up three edges leaving the top edge open for turning.
Turn your towel right side out to look like this:
Fold in raw edge 1/4 inch and sew a hem. Then fold towel by bringing ends together. Place the end you hemed on top and sew together. At this point, your towel may be too thick to sew on your machine. If so, you will need to hand sew it.
Afterwards, it will look like this:
Thread a ribbon using a wide-eyed needle.
To get it through the needle cut the ribbon at an angle and put the very tip of the ribbon through the needle first.
Fold the top down about one inch. Pull ribbon through towel on one side, then back through the other side so that you can tie a bow. If it’s too thick and the ribbon will not go through the towel, use a pair of scissors to make a small slit so the ribbon will go through.
Congratulations! You did it!
Other tutorials you may like: DIY Ruffled Towels Tutorial
Craft Room Tips: Hair Straightener to Ribbon Iron

Follow SewLicious Home Decor’s board SEWlicious Sew’en Stuff on Pinterest.

Related Posts
 1.5k
1.5k 35
35
 11
11 1
1 0
0 0
0


Thank you for sharing on Whatever Wednesday at Thank You Honey! Hope you have a great week!
Featuring your post this week Marti! Thanks for sharing 😉
Thank you so much, Theresa!!
Such a cute idea, I love it!!
<3
Harlynn
mindyourmadness.blogspot.com
Thank you, Harlynn! I’m glad you stopped by!
Oh I love this tutorial Marti! I want to make one. Looks like a quick and easy project too. Thanks for sharing at the party! Hope to see you again this week!
Thank you, Theresa! It’s very quick and easy…and fun!
Great share found you on google+!!!
Thank you! I’m so glad you were lead here….I hope you come back often!
Hi Marti,
This is such a cute idea to keep bread warm. I bake home made bread every week, so I’ll have to whip one up asap. Have a great day!
Val
Hi Val! Let me know how it turns out and I would love to see pics!!