CRAFTS RECIPES                                                                                                                                                                                                              
  • home
  • about
  • contact
  • the kitties


SewLicious Home Decor

  • CRAFTS
    • Crafts
    • Craft Room
    • Helpful Tips
    • Tutorials
    • Wreaths
    • Recycled/Upcycled
    • Mason Jars
    • Paper Crafts
    • Printables
      • Gift Tags
    • Round Ups
  • SEWING ROOM
    • Sewing Room
    • Sewing Tips
  • DOLLAR STORE CRAFTS
  • ORGANIZATION
  • CLEANING TIPS
  • CLASSES
    • Craftsy
    • Photography 101
  • SEASONAL
    • Fall/Halloween/Thanksgiving
    • Pumpkins
    • Summer/Spring
    • Valentines
    • Easter
    • Christmas
  • RECIPES
    • Recipes
    • Baking Tips
    • Desserts
    • Pies
    • Breakfast
    • Cookies
    • Cakes
    • Cupcakes
Home » BOO Halloween Wreath + Tutorial

BOO Halloween Wreath + Tutorial

on September 29, 2013

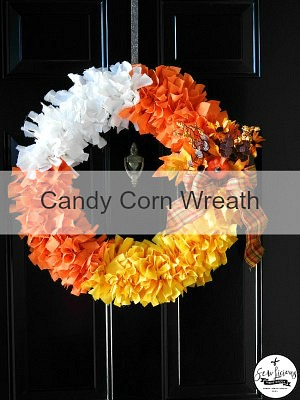
Don’t you just love this time of year and all the fun craft projects to be made! I am loving the Fall colors. It’s time to start getting ready for Halloween, which is another reason why I love this time of year. It’s so fun to decorate for Halloween. Not to mention the kids also have a great time this time of year. I made this wreath for my daughter. I had so much fun making it. It’s so easy and inexpensive I’m going to make another one for myself.

Supplies Needed:

1 Wreath
Felt flower tutorial
8 Pieces of orange felt=22 flowers (.23 cents at Wal-mart)
2 Pieces of black felt=6 flowers
(you get 3 flowers out of 1 felt piece)
Halloween scrapbook paper
The lid to one cardboard box ( I bought a box at Wal-mart for .69 cents)
‘BOO’ letters. I found these at Jo-Ann’s. (1.99 each)
12′ cut ribbon ($1.19 at Michael’s)
Hot glue gun or glue. Hot glue works best.

I made 22 oranges flowers using my felt flower tutorial.

I measured my banner according to the size of my letters. I allowed about 1 1/2 inch on each side of the letters. Measure how big you want your banner to be then trace your banner on the back of your scrapbook paper. Use a pencil, a pen will show through the paper. Cut it out. Then using a cardboard box lid, trace the same banner and cut out.

You will glue the scrapbook paper to the cardboard box lid. I tried using poster board but it would not lay flat, the ends curled up so I had to use something else thicker that would not lose it’s shape. You can also use the thicker poster board. I just wouldn’t use anything thin like a cereal box or regular poster board. I bought a cardboard box at Wal-marti for .69 cents. Believe me, it was worth it!


After you have cut out and glued your scrapbook paper to your banner, hot glue your letters in place, then punch a whole in each corner of the banners to run your ribbon through. I used a 12′ piece of ribbon. I hot glued my banner onto the wreath first then hot glued the flowers.

Then I added about a 4 inch ribbon to the top to hang it with.

This has been featured at:

A Glimpse Inside


Comments

  1. Melissa @ DaisyMaeBelle says

    October 7, 2013 at 6:52 pm

    Super cute wreath! The rosettes are the perfect touch! Life to the full! Melissa

    Reply
    • Marti says

      October 8, 2013 at 6:21 am

      Thank you, Melissa! 🙂

      Reply
  2. Shawna says

    October 7, 2013 at 8:59 am

    What a pretty wreath and very budget friendly. Visiting you from Marvelous Mondays.
    Easy Life Meal and Party Planning.

    Reply
    • Marti says

      October 7, 2013 at 10:09 am

      Thank you, Shawna! 🙂

      Reply
  3. T'onna says

    October 6, 2013 at 9:04 pm

    Cute wreath! I love the orange rosettes!

    Navy Wifey Peters @ Submarine Sunday Link Party

    Reply
    • Marti says

      October 7, 2013 at 10:18 am

      Thank you, T’onna! 🙂

      Reply
  4. Allison {A Glimpse Inside} says

    October 4, 2013 at 1:40 am

    Very nice! Great job!
    Thanks for linking up to this week’s Catch a Glimpse Party! I’ll be featuring this tomorrow! 🙂

    Reply
  5. Abby @ Just a Girl and Her Blog says

    October 3, 2013 at 8:24 pm

    What a beautiful Halloween wreath! The rosettes and the bunting look so perfect together. Thanks so much for sharing this at Get Your DIY On! I hope to see you on Sunday to link up your chalkboard projects! Have a wonderful week!

    ~Abby =)

    Reply
  6. Michele says

    September 30, 2013 at 7:21 am

    I love the wreath! How festive fun is that?! I would love to have that hanging on my front door all season!!

    Reply
    • Marti says

      September 30, 2013 at 8:00 am

      Thank you!! 🙂

      Reply

Trackbacks

  1. Fridays Freebies-Halloween Gift Tags says:
    October 18, 2013 at 9:50 pm

    […] BOO Wreath Tutorial […]

    Reply
  2. Fall Pumpkin Wreath and Pumpkin Tutorial says:
    October 14, 2013 at 8:06 pm

    […] the fall leaves so I added some fabric Pumpkin’s and now it’s a Fall Pumpkin Wreath. BOO Wreath Pumpkin full of Kittens Scrapbook Paper Pumpkin Join our Craft Club and never miss a […]

    Reply
  3. How to make a Fabric Pumpkin Tutorial {halloween} says:
    October 14, 2013 at 7:54 pm

    […] BOO Wreath […]

    Reply
  4. Pumpkin Full Of Kittens {halloween} says:
    October 13, 2013 at 7:32 pm

    […] BOO Halloween Wreath Tutorial […]

    Reply
  5. BOO Halloween Wreath Tutorial · Felting | CraftGossip.com says:
    October 13, 2013 at 2:23 pm

    […] “BOO Halloween Wreath” tutorial comes from “Sew Licious Home Décor” and is easy and inexpensive; using felt flowers and there is also a tutorial for the flowers. […]

    Reply
  6. 20 Things To Do For Halloween! + Free Printables! says:
    October 9, 2013 at 9:35 pm

    […] Make a BOO Wreath Tutorial […]

    Reply
  7. Friday Freebies-Halloween Patterns and Craft Projects says:
    October 4, 2013 at 1:27 pm

    […] I’ve been making some fun crafts for this Halloween season. I had so much fun making my BOO Halloween Wreath using felt flowers tutorial and bunting, and I am so excited to share my BOO Your Neightbor […]

    Reply
  8. Felt Flower Step by Step Tutorial says:
    September 30, 2013 at 1:22 pm

    […] I used these flowers to make my BOO Halloween Wreath. […]

    Reply
  9. BOO Your Neighbor-Instructions + Free Printables says:
    September 29, 2013 at 10:31 pm

    […] is easy and inexpensive! BOO Halloween Wreath with a felt flower […]

    Reply
  10. BOO Halloween Wreath says:
    September 29, 2013 at 6:00 pm

    […] tutorial HERE @ Sewlicious Home […]

    Reply
I love hearing from my readers! Please leave a comment below. :)
Follow Me!

Comments Cancel reply

SEWING ROOM

Free Sewing Printables Monthly Planner

Easter Egg Zipper Pouch with Key Holder Tutorial

Placemat with Plastic Baggies Sewn Into A Roll up Organizer

DIY Christmas Sewing Kit

Page 1 of 11 1234…1011Next »
DOLLAR STORE CRAFTS

DIY Shirt Letters Baby Gift

Easy DIY Decorated Christmas Bags

Easy Rustic Cinnamon Salt Dough Star Christmas Tree Ornaments

Cinnamon Salt Dough Gingerbread Man Garland

Page 1 of 11 1234…1011Next »

Get the eBook FREE when you join!

READERS FAVORITES:

Using A Seam Ripper What is the little ball for
18 Tips How To Doctor A Boxed Cake Mix To Taste Like Homemade
50 Burlap Christmas Decorations
100 Party Chex Mix Puppy Chow Recipes and Appetizers
Homemade Peach Cobbler Crisp
25 Recycled Upcycled Entertainment Centers Furniture Projects
Folded Holiday Crown Napkin Tutorial
29 Uses For Recycled Coffee Cans

Hosted by "Callie"


pg. 37 DIY Rooster Jar

RECENT POSTS:

  • How To Bring Butter To Room Temperature
  • Best Cookie Gadgets
  • Christmas Card Exchange Around The World
  • Best DIY Camping Hacks
  • Recipe Free Printable
  • Free Sewing Printables Monthly Planner
  • BOO Your Neighbor-Instructions + Free Printables
  • Pumpkin Full Of Kittens {halloween}
Get the eBook FREE when you join!