How To Assemble A Pastry Bag For Icing
Easy instructions for assembling and filling a pastry bag, and how to use tips. This will give you more decorating options, when decorating your cakes, cupcakes, and cookies.

My daughter and I took a Wilton class and we learned how to use a pastry bag and decorating tips. One thing you need to know, when it comes to decorating cakes and cupcakes, it takes practice. You will need to practice to perfect your skill. You can start by practicing on paper, but then you don’t have any cupcakes to eat afterwards.
So, don’t worry if your icing doesn’t look the way you want it to at first. That’s ok! Keep practicing and you will get it down in no time!
HOW TO ASSEMBLE A PASTRY BAG
Supplies You Will Need To Decorate Cupcakes
Pastry bags. There are three kinds of pastry bags. Reusable, Disposable, and Parchment.
- Reusable pastry bags come in a variety of sizes and are made from canvas, nylon, plastic, or plastic lined cotton. They are lined to prevent leaks, easy to use, and washable. To wash them you turn them inside out and wash with soap and water. Avoid the dishwasher.
- Disposable pastry bags are made from clear plastic. They can be used for quick jobs and are easy to clean up. You just toss them in the trash when you’re finished.
- Parchment pastry bags are made from parchment paper sheets. They are pre-cut sheets. You roll them to form a cone. They put out a thin line of icing for writing. There are no tips or couplers used with parchment bags.
- Other option. If you don’t have pastry bags, you can use large ziplock plastic baggies. Just follow the same steps below. You will put your icing in the corner of the baggie and snip that corner.
When using a reusable or disposable bag, you snip off the very tip. You want to make sure you snip just a small amount so your coupler or tips don’t come out, you can always cut more off, but it doesn’t take much so start slow!
Pastry Bag Ties. These are used to seal the top of the pastry bag so icing does not come out of the end. They wrap around the bag like a rubber band. To maintain pressure, slide the bag tie down as your squeezing the icing out.
Bag ties are an option and not a “must have” item. If you don’t use bag ties, you will just twist the pastry bag a couple of times so icing does not come out of the top of the bag when you are squeezing it out. Experiment with it and see which option you like the best.
Couplers. You need couplers to hold your tips in place. They are used when you’re using a reusable bag or a disposable bag. They come in three sizes, small, medium, and large, but 99% of the time you will only find the standard size which works for most tips, and this is the size you will most likely use, unless you are decorating a LOT and need the large coupler for larger tips.
When you use a coupler, this gives you the option of changing out the tip without changing bags. So you can keep the same color of icing and change the tip for different techniques.
When using a tip, you will snip off the end of the pastry bag, drop your coupler inside the bag, then screw the tip on the outside of the bag with the other end of the coupler.
The other option is to drop the decorating tip directly into the pastry bag.
There’s no right way or wrong way to using your pastry bag. It’s just a personal preference if you want to use couplers or not. Mainly, couplers are used when you need to change out the tips but keep the same icing so you’re not having to change bags.
Couplers cannot be used with parchment bags.
Decorating Tips. Decorating tips come in many different shapes and sizes and are metal. You can either drop the decorating tip directly inside the pastry bag or use a coupler.
Some of the popular tips are Leaf tips #65, #67, and #352. Rose tips #101, #102, #104, #124, and 127.
For cupcakes I use a 1M Wilton tip, You can see that design on my Candy Corn cupcakes.
To add a filling inside a cupcake you would use a Wilton round tip #230.
Wilton gives a good description of other tips:
Round tips
Used for outlining details, filling and piping in areas, writing and printing messages, figure piping, dots, balls, beads, stringwork, lattice and lacework, vines, flower centers and floral work. These tips are smooth and round.
Leaf Tips
Create perfect floral enhancements. The v-shaped openings of these tips give leaves pointed ends. With any leaf tip you can make plain, ruffled or stand-up leaves.
Drop Flower tips
Make pretty one-squeeze flowers—these are the easiest flowers for a beginning decorator to do. The number of cuts on the end of the tip determines the number of petals the flower will have. Each drop flower tip can produce two different flower varieties—plain or swirled.
Ruffle tips
Ruffle tips have a teardrop-like shaped opening that yields ribbons, swags, bows, streamers, scallops, ruffles and special effects.
Basketweave tips
Basketweave tips are wonderful for woven designs. These decorating tips have a smooth side for making smooth, wide icing stripes and/or one serrated side for making ribbed, wide icing stripes.
Rose tips
Rose tips have an opening that is wide at one end, narrow at the other. Using rose tips you can make a variety of petals that form flowers like the rose, carnation, daisy, pansy and more. Roses are typically created using tip 12 or tip 104 decorating tips.
Specialty tips
Specialty tips add a totally different look! This family includes tips with very distinctive design. Use them to make ring candleholders, deeply ridged shell borders, Christmas trees, hearts, three-dimensional and ridged ruffles.
Star Tips
Star tips produce the most popular decorations—deeply grooved shells, stars, fleur-de-lis, rosettes and flowers. The most popular star tips used are numbered 13 through 22.
Multi-opening Tips
Pipe rows and clusters of strings, beads, scallops, even grass and hair!
How To Use A Coupler With A Pastry Bag
Assembly
Unscrew the coupler.
- Place the large piece inside the bag.
- Measure how much of the tip you will need to cut off. It doesn’t take much! Cut a little at first, you can always cut more if you need to. If you cut off too much, the coupler will come out when you’re squeezing out the icing.
- You will cut just where the grooves begin. (shown below) This process applies to both disposable and re-usable pastry bags.
Once you have your coupler on and the tip is cut, you can change out tips if you are doing several different designs.
Once your coupler is inside the bag, put your tip on the outside of the bag, then screw the coupler on over the tip, as shown. The coupler is what holds the tip in place.
Some of Wilton’s tips are very large and will not fit on a coupler. For those tips, you will cut off the tip of the bag and drop the tip down into the pastry bag.
If you’re plan on using just one tip, you can always just drop the tip into the pastry bag and bypass a coupler all together.
Filling The Pastry Bag
You can use this method for plastic or disposable bags.
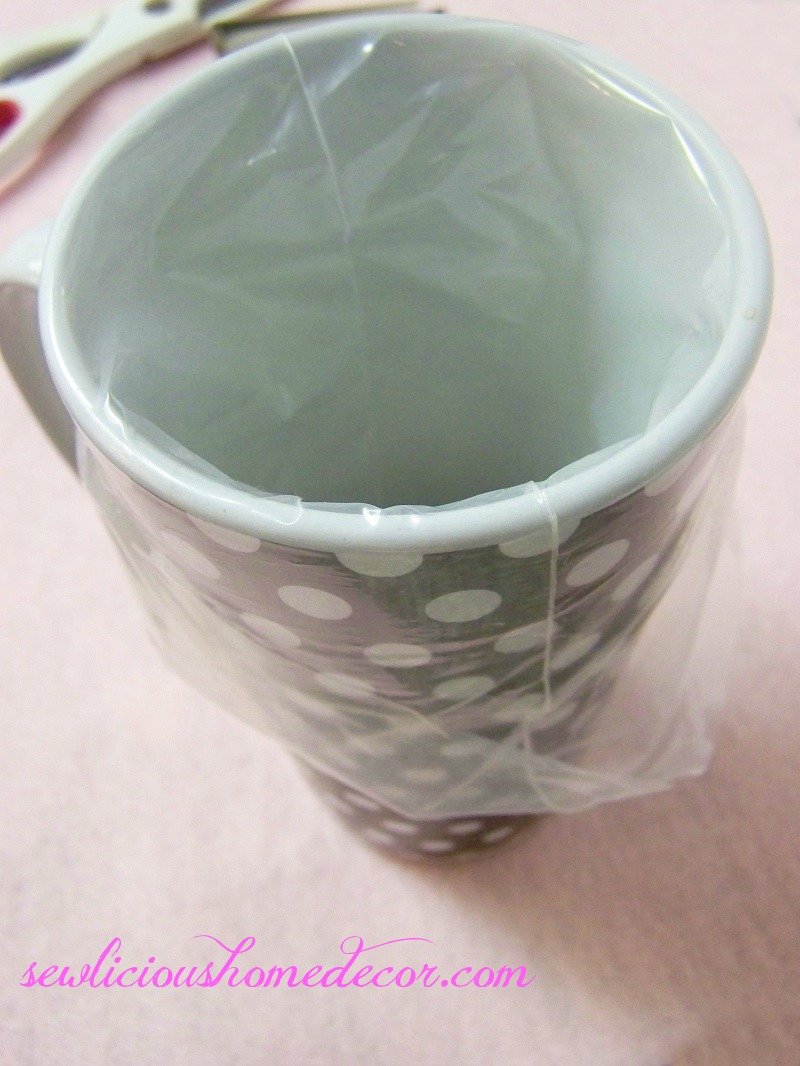
- Put the bag inside a tall cup and fold the edges over the cup.
- Spoon in the icing.
- With a spoon or a spatula, fill the bag with icing. You want it full, so fill it to the top of the cup, but still giving your bag room to twist it closed at the top. You can also use bag ties to secure the top.
- Remove the bag and twist the top a few times to close it up tightly.
- Grip the top of the bag and squeeze it until icing comes out. If your coupler comes out, that means the hole is too big and you will need to make another bag. It happens! Keep doing it until you get the hang of it!
TIP: You can also use the cup to hold your pastry bag when you’re not using it! Just stand the pastry bag up in the cup.
Cleaning The Pastry Bag and Tips
Use a small brush, toothbrush or toothpick, to clean your tips. If you used a reusable bag, turn it right side out and wash out the icing with soap and water. It’s best to clean up immediately after you are finished so the icing does not dry and get hard.
If it doesn’t turn out the way you want the first time, keep practicing! Practice makes perfect for this project. The more you experiment the easier it becomes!


Pingback: Best Homemade Buttermilk Strawberry Cake with Strawberry Cream Cheese Icing - SewLicious Home Decor
Pingback: Bat Velvet Halloween Oreo Cookies
Pingback: Best Cookie Gadgets For The Holidays - SewLicious Home Decor
Pingback: Halloween Candy Corn Cupcakes
Pingback: Hot Fudge Sundae Cupcakes
Pingback: Best Banana Pudding Cupcakes