Welcome to another Tuesday of SEW Organized craft room ideas! If your new join me every Tuesday for a craft room project, you can see all the previous craft room ideas here.
I spend every weekend at garage sales and thrift stores..a post on that coming up. I love a bargain! I found this tray at Goodwill for $9.99. That’s a little more than what I usually spend, I’m used to paying .50 cents or 1.00 but I had been wanting one of these for awhile so I went ahead and splurged.
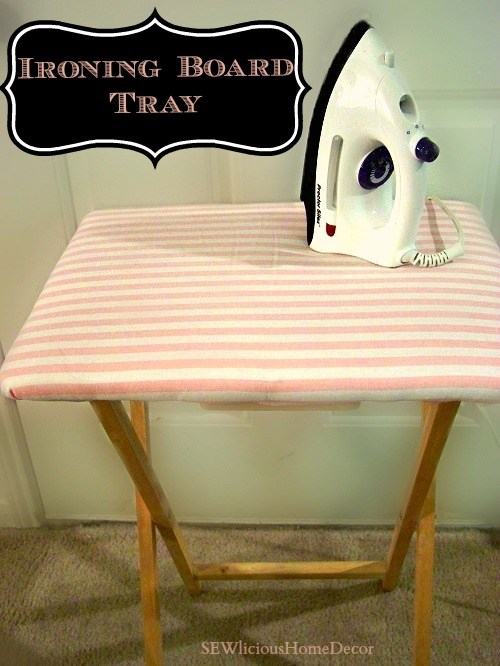
I turned the tray into a mini-ironing board for my craft room. It takes up less space than a regular ironing board and I can leave it sitting out without the hassle of getting it out and putting it away every time I just need to iron a small crease.
Supplies Needed:
Batting
Fabric
Wood nails or a staple gun
Hammer
Hot glue gun
* Update: If you place a piece of heavy duty foil on the tray before adding the batting it will draw in the heat making it easier to iron out creases.
I cut 2 pieces of batting and one piece of fabric the size of the tray plus allowed extra about 1 1/2 inches on each side to allow enough extra fabric to fold over and under the bottom of the tray. If I did it over again I would have hemmed the edges first for a nice finished look.
I then used small wood nails and nailed the fabric and batting to the back of the tray. You can also use a staple gun. Then I hot glued the raw edges to the tray so they weren’t hanging down.
Let’s keep in touch and never miss an update!
This has been featured at these great sites:
If you enjoyed this post please give it a like. 🙂
Linking to these great parties.
[…] and Toffee Muddy Buddies Fall Rag Wreath Napkin Wall Art Skipper Dress Ironing Board Tray Lazy Day Cookie […]
[…] and Toffee Muddy Buddies Fall Rag Wreath Napkin Wall Art Skipper Dress Ironing Board Tray Lazy Day Cookie […]
[…] Tray Ironing Board […]
[…] Turn a tray into an Ironing Board Tray […]
[…] more? Turn a t.v. tray into a ironing board so you don’t have to drag out the large ironing board every […]
[…] my Sewing Machine Organizer to keep all my sewing supplies handy while I was sewing. I used my Ironing Board Tray to iron the seams. It takes up less space and is so much easier to use than dragging out the […]
[…] I can’t live without my Ironing Board! […]
Very cute idea! I have one of these little tables…. need to make one. Can you kitty helpers come help me, too?!
They would love to!! 😉 It’s so much better than getting out the huge ironing board!!
[…] For this small project I used my Ironing Board Tray […]
Very clever and creative! 🙂
Thank you! Thank you so much for stopping by! 🙂
Love the Idea, and the size of the project is also great since it saves a lit in space, but Marti, what I’m really loving is your kitties photo bombing your pic! Priceless! thank you so much for linking it up to the Fluster Buster Party, Have a fantastic week, Lizy party co host
HAHA! Thank you, Lizy! They help me all the time! 😉
I am a foodie, but really appreciate your clever idea. I am space challenged so this is especially appealing.
This is such a great idea! I have been ironing on my kitchen table with a towel but i have one of these TV tables folded up behind the couch and now I am headed to the craft store for batting and material. Pinning!
Thanks for the inspiration, I would love for you to share this at the Krafty Inspiration Thursday Link Party tomorrow, it’s live at 7 am est.
Maria @ Krafty Cards etc.
That’s awesome you are going to make one! I’d love to see a pic. I’ve done the same thing using my kitchen counter. This has become something I cannot live without!
What a great idea! I’m also a big thrift store shopper and I’ve been thinking about getting a mini ironing board for my craft room. Love this!
I would love to have one of these little things in my craft room! I have to either trudge downstairs to iron something or haul the ironing board upstairs. And I usually don’t remember BEFORE I start crafting. So handy! We’ll be featuring this over at Someday Crafts tomorrow!
Awesome! Thank you so much! 🙂 It is definitely much easier than dragging out the ironing board!
What a great idea! I have a set of little trays I used when I was single living with a roommate…18years ago!! I can put them to use once again!
Thanks
Awesome! It’s so much easier to use than dragging out the regular ironing board! 🙂
I made mine and have been working hard and fast. Fun and easy to make, I also used a staple gun to anchor fabric. So much easier to piece my quilt blocks and just slightly turn and iron my seams. Thanks for a great idea.
Awesome! I would love to see a pic if you have one. 🙂
Cute project! I’ve been wanting to make one for a few years but got involved in papercrafting and sort of forgot about my sewing and quilting. But with an upcoming shoulder surgery I’m thinking some one-armed sewing could be managed and with a sweet little ironing station like this so handy it would be even easier. One tip for you from when I made a ginormous ironing surface to go under my machine quilting frame…next time apply a layer of the really heavy aluminum foil over the wood with the shiny side up. It will help reflect heat back into the batting and fabric and make creases better as well as give the substrate a bit more protection.
That’s a great tip, thank you!! I’m making two more of these for some friends and I will do that with the foil! It has definitely made my ironing easier, I no longer have to drag out the ironing board anymore I just leave this out in my craft room and find that I iron more often now. Good luck with your surgery, I wish you a speedy recovery! 🙂
Marti
Now this is clever! I really need to make an ironing board tray for my craft room. Thanks for sharing on COM Monday!!
Katie
http://www.funhomethings.com
Thank you, glad you like it. 🙂
THIS IS GREAT BUT TO MAKE IT EASIER I USED A STAPLE GUN FOR TACKING LIKE WITH MY VALANCES IT WENT SO MUCH FASTER. MY FREEZER WAS MY WORK BENCH AS IT WAS SO LONG.
I WILL BE USING STAPLES WHEN I MAKE ONE OF THESE.
Awesome! I’d love to see it after you make one! 🙂 A freezer work bench sounds like a great work table to have! Yes, a staple gun would work great!
Oh wow, what an innovative idea! I have very limited sewing/crafting space, and the ironing board sure takes up a lot of room. We have some old wooden trays, so I will have to attempt to make one of these for sure 🙂